Nuxt で Google Maps API を使ってみる
Nuxt.js
GCP
Google Maps
Nuxt + Google Maps API を使ってマップの表示とルート表示を行います。
はじめに
本記事は、Nuxt で Google Maps API 使ってみた備忘録です。
Google Maps API は Google Map にまつわる様々な機能が扱えるが、今回は
Maps JavaScript API を使ったマップ表示と、Directions API を使ったルート表示までを行います。
準備
API Key 作成
Google Cloud のコンソールから API キーを作成します。
使用するAPIは
- Maps JavaScript API
- Directions API
の2つです。
上記 API を有効化し、API キーを作成してください。
作成した API キーを .env で管理します。
NUXT_PUBLIC_SCRIPTS_GOOGLE_MAPS_API_KEY=<your-api-key>
Map ID 作成
Google Cloud Platform
https://console.cloud.google.com/google/maps-apis/overview
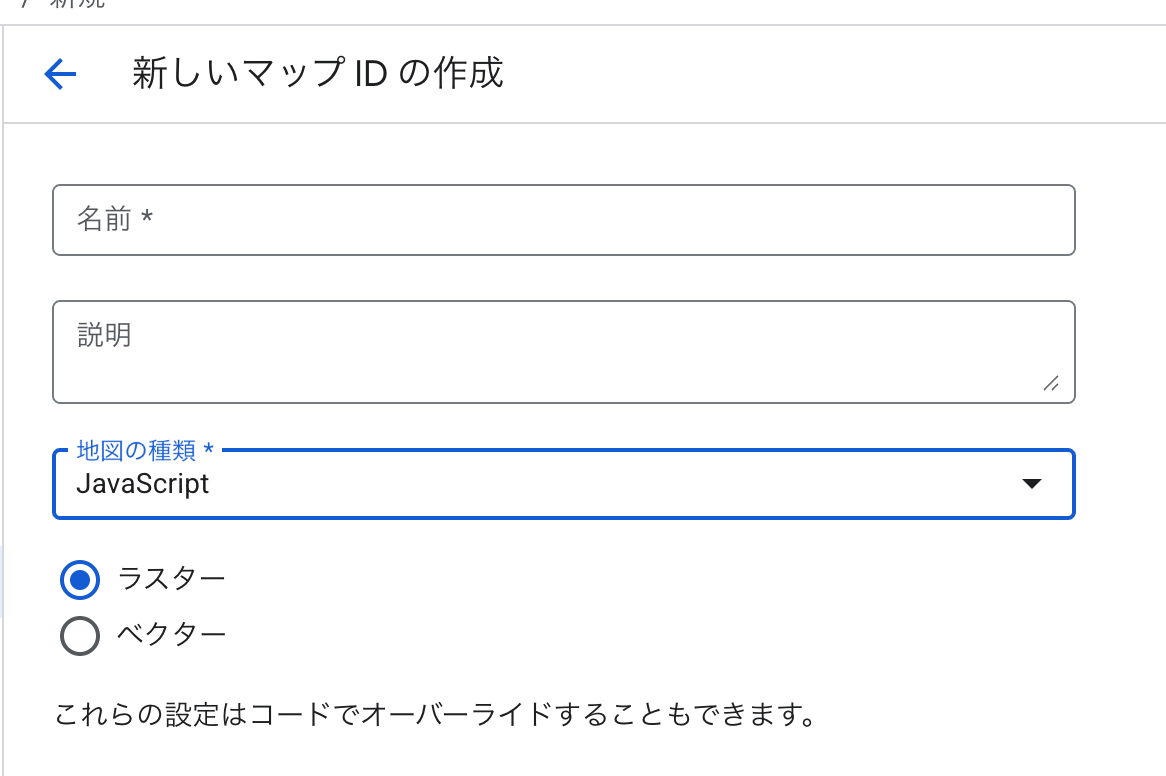
Google Maps Platform の オーバービューから マップマップ管理 を選択し、マップIDを作成 へ進みます。

名前と説明は任意の値を入力し、地図の種類を JavaScript を選択します。ラスターとベクターは地図の形式の違いです、今回はラスターで問題ないです。
環境変数としてruntimeConfigに設定しておきます。
export default defineNuxtConfig({
 runtimeConfig: {
    public: {
      googleMaps: {
        mapId: '<your-map-id>'
      },
    },
 ],
})
Nuxt Scripts
Google Maps API を利用するにあたり、スクリプトの読み込みに Nuxt Scripts を使用します。
Third-Party Scripts Meets Nuxt DX · Nuxt Scripts
https://scripts.nuxt.com/

Google Maps · Nuxt Scripts
https://scripts.nuxt.com/scripts/content/google-maps
インストール
Nuxi を用いてインストールします。
npx nuxi@latest module add scripts
Google Maps を TypeScript で扱うために @types/google.maps パッケージをインストールします。
pnpm add -D @types/google.maps
yarn add -D @types/google.maps
npm install -D @types/google.maps
bun add -d @types/google.maps
tsconfig.json で読み込むようにしておきます。
{
  // https://nuxt.com/docs/guide/concepts/typescript
  "extends": "./.nuxt/tsconfig.json",
+  "compilerOptions": {
+  "types": ["google.maps"]
+ }
}
nuxt.config
ドキュメントに従って API キーを環境変数として定義します
(.envで定義しているのでここでは空文字)
export default defineNuxtConfig({
 runtimeConfig: {
    public: {
      // ...other prop
      scripts: {
        googleMaps: {
          apiKey: '',
        }
      },
    },
 ],
})
地図を表示する
まずは、地図を表示してみるところまで進めます。
BasicMap コンポーネント作成
~/components/map/BasicMap.vueを作成して、そこに Google Maps API を呼ぶように作ります。
<script setup lang="ts">
type Position = { lat: number, lng: number }

const props = defineProps<{
  position: Position
  zoom?: number
}>()

const config = useRuntimeConfig()

const mapRef = ref<HTMLElement | null>(null)

const { onLoaded } = useScriptGoogleMaps()

onMounted(() => {
  // Google Maps の読み込みが完了したら実行
  onLoaded(async (instance) => {
    if (!mapRef.value) {
      return
    }

    // Google Maps API モジュールを取得
    const maps = await instance.maps
    // MapsLibrary から Map クラスを取得
    const { Map } = await maps.importLibrary('maps') as google.maps.MapsLibrary

    // Google Map のインスタンスを生成して DOM に描画
    new Map(mapRef.value, {
      center: props.position,
      zoom: props.zoom ?? 8,
      mapId: config.public.googleMaps.mapId,
    })
  })
})
</script>

<template>
  <div
    ref="mapRef"
    class="w-full aspect-video"
  />
</template>
コンポーネントを呼ぶ側
props として 緯度・経度、ズーム値を渡します。
// 皇居の緯度経度を渡す
<BasicMap :position="{ lat: 35.685355, lng: 139.753144 }" :zoom="14" />
画面表示はこんな感じ
地図にマーカーを追加する
少し手を加えて、地図上の position の位置にマーカーを表示してみます。
BasicMap.vue コンポーネント修正
BasicMap.vue を修正します。
<script setup lang="ts">
type Position = { lat: number, lng: number }

const props = defineProps<{
  position: Position
  zoom?: number
  // マーカー表示を制御する props
  enableMarker?: boolean
}>()

const config = useRuntimeConfig()

const mapRef = ref<HTMLElement | null>(null)

const { onLoaded } = useScriptGoogleMaps()

onMounted(() => {
  onLoaded(async (instance) => {
    if (!mapRef.value) {
      return
    }

    const maps = await instance.maps
    const { Map } = await maps.importLibrary('maps') as google.maps.MapsLibrary
    // マーカーのクラスを取得
    const { AdvancedMarkerElement } = await maps.importLibrary('marker') as google.maps.MarkerLibrary

    const map = new Map(mapRef.value, {
      center: props.position,
      zoom: props.zoom ?? 8,
      mapId: config.public.googleMaps.mapId,
    })

    // enableMarker が true の場合マーカーを表示
    if (props.enableMarker) {
      new AdvancedMarkerElement({
        map,
        position: props.position,
      })
    }
  })
})
</script>

<template>
  <div
    ref="mapRef"
    class="w-full aspect-video"
  />
</template>
コンポーネントを呼ぶ側
<BasicMap
  :position="{ lat: 35.685355, lng: 139.753144 }"
  :enable-marker="true"
  :zoom="14"
/>
画面表示はこんな感じ
2点間のルート表示
今度は、2点間のルートを表示してみます。
コンポーネント作成
ルート表示用に新たに~/components/map/RouteMap.vueを作成します。
<script setup lang="ts">
type Position = { lat: number, lng: number }

const props = defineProps<{
  positions: {
    start: Position
    end: Position
  }
}>()

const config = useRuntimeConfig()

const mapRef = ref<HTMLElement | null>(null)

const { onLoaded } = useScriptGoogleMaps()

onMounted(() => {
  onLoaded(async (instance) => {
    if (!mapRef.value) {
      return
    }

    const maps = await instance.maps
    const { Map } = await maps.importLibrary('maps') as google.maps.MapsLibrary
    // routes ライブラリから DirectionsService(経路検索)と DirectionsRenderer(経路描画)を取得
    const { DirectionsService, DirectionsRenderer } = await maps.importLibrary('routes') as google.maps.RoutesLibrary

    // 地図インスタンスを作成
    const map = new Map(mapRef.value, {
      mapId: config.public.googleMaps.mapId,
    })

    // インスタンス生成
    const directionsService = new DirectionsService()
    const directionsRenderer = new DirectionsRenderer()

    // 地図上にルートを描画する設定
    directionsRenderer.setMap(map)

    // 出発地と目的地の緯度経度を LatLng オブジェクトに変換
    const origin = new google.maps.LatLng(props.positions.start.lat, props.positions.start.lng)
    const destination = new google.maps.LatLng(props.positions.end.lat, props.positions.end.lng)

    // 経路検索のリクエストを作成
    const request = {
      origin,
      destination,
      travelMode: google.maps.TravelMode.DRIVING,
    }

    // 経路を検索して描画する
    directionsService.route(request, (result, status) => {
      // ステータスが OK(正常)ならルートを地図上に描画
      if (status === 'OK') {
        directionsRenderer.setDirections(result)
      }
    })
  })
})
</script>

<template>
  <div
    ref="mapRef"
    class="w-full aspect-video"
  />
</template>
コンポーネントを呼ぶ側
// 皇居 ~ 都庁 間のルート表示
<RouteMap
  :positions="{
    start: { lat: 35.685355, lng: 139.753144 },
    end: { lat: 35.689419, lng: 139.691682 },
  }"
/>
画面表示はこんな感じ
複数地点を経由するルート検索
2点間だと、環状のルートを表示するときに詰みます。 例えば、山手線の一周のルートを開始・終了位置を新宿駅で設定したとします。
するとこんな感じになります↓
開始・終了位置が同じなので当たり前なのだが
中間ウェイポイントを設定することによってこの問題を回避します。
RouteMap コンポーネント修正
中間ウェイポイントを配列で受け取れるように props を修正します。
<script setup lang="ts">
type Position = { lat: number, lng: number }

const props = defineProps<{
  positions: {
    start: Position
    end: Position
    // 中間ウェイポイントを配列で受け取る
    waypoints?: Position[]
  }
  enableMarker?: boolean
}>()

const config = useRuntimeConfig()

const mapRef = ref<HTMLElement | null>(null)

const { onLoaded } = useScriptGoogleMaps({
  apiKey: config.public.scripts.googleMaps.apiKey,
})

onMounted(() => {
  onLoaded(async (instance) => {
    if (!mapRef.value) {
      return
    }

    const maps = await instance.maps
    const { Map } = await maps.importLibrary('maps') as google.maps.MapsLibrary
    const { DirectionsService, DirectionsRenderer } = await maps.importLibrary('routes') as google.maps.RoutesLibrary
    const map = new Map(mapRef.value, {
      mapId: config.public.googleMaps.mapId,
    })

    const directionsService = new DirectionsService()
    const directionsRenderer = new DirectionsRenderer({ suppressMarkers: props.enableMarker })
    directionsRenderer.setMap(map)

    const origin = new google.maps.LatLng(props.positions.start.lat, props.positions.start.lng)
    const destination = new google.maps.LatLng(props.positions.end.lat, props.positions.end.lng)

    const request = {
      origin,
      destination,
      // 中間ウェイポイントが存在する場合は LatLng に変換、なければ空配列
      waypoints: props.positions.waypoints
        ? props.positions.waypoints.map(point => ({
            location: new google.maps.LatLng(point.lat, point.lng),
            stopover: true,
          }))
        : [],
      travelMode: google.maps.TravelMode.DRIVING,
    }

    directionsService.route(request, (result, status) => {
      if (status === 'OK') {
        directionsRenderer.setDirections(result)
      }
    })
  })
})
</script>

<template>
  <div
    ref="mapRef"
    class="w-full aspect-video"
  />
</template>
コンポーネントを呼ぶ側
<RouteMap
  :positions="{
    start: { lat: 35.690921, lng: 139.70025799999996 },
    end: { lat: 35.690921, lng: 139.70025799999996 },
    waypoints: [
      { lat: 35.683061, lng: 139.702042 }, // 代々木
      { lat: 35.670168, lng: 139.70268699999997 }, // 原宿
      { lat: 35.658517, lng: 139.70133399999997 }, // 渋谷
      { lat: 35.64669, lng: 139.710106 }, // 恵比寿
      { lat: 35.633998, lng: 139.715828 }, // 目黒
      { lat: 35.626446, lng: 139.72344399999997 }, // 五反田
      { lat: 35.6197, lng: 139.72855300000003 }, // 大崎
      { lat: 35.630152, lng: 139.74044000000004 }, // 品川
      { lat: 35.645736, lng: 139.74757499999998 }, // 田町
      { lat: 35.655646, lng: 139.756749 }, // 浜松町
      { lat: 35.665498, lng: 139.75964 }, // 新橋
      { lat: 35.675069, lng: 139.763328 }, // 有楽町
      { lat: 35.681382, lng: 139.76608399999998 }, // 東京
      { lat: 35.69169, lng: 139.77088300000003 }, // 神田
      { lat: 35.698683, lng: 139.77421900000002 }, // 秋葉原
      { lat: 35.707438, lng: 139.774632 }, // 御徒町
      { lat: 35.713768, lng: 139.77725399999997 }, // 上野
      { lat: 35.727772, lng: 139.770987 }, // 日暮里
      { lat: 35.738062, lng: 139.76085999999998 }, // 田端
      { lat: 35.733492, lng: 139.73934499999996 }, // 巣鴨
      { lat: 35.731401, lng: 139.72866199999999 }, // 大崎
      { lat: 35.728926, lng: 139.71038 }, // 池袋
      { lat: 35.721204, lng: 139.706587 }, // 目白
      { lat: 35.712285, lng: 139.70378200000005 }, // 高田馬場
      { lat: 35.701306, lng: 139.706587 }, // 新大久保
    ],
  }"
/>
画面表示はこんな感じ
Directions API 出発地点、到着地点、中間地点あわせて25箇所までしか設定できません。(山手線は30駅あるので影の薄い駅を端折りました。)
おわりに
Google Maps Platformを使ってマップの表示などをまとめました。
今回紹介した API 以外にもおもしろそうな API がいくつもあるのでまた試してみたいです。
参考文献
山手線停車駅の座標一覧 - Qiita
https://qiita.com/butchi_y/items/3a6b70b38e13dc56ef13